How to call VB 2005 or VB.net assembly/DLL from VB 6.0
1) Create any VB.NET class library project (say MyDll), here I am giving example of calling Visual Basic .NET or Visual Basic 2005 assembly from Visual Basic 6.0
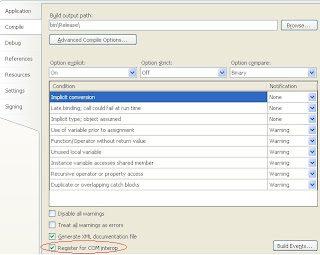
2) Add any class (say Customer) and create some method (say GetEmployeeRecordset()) inside it 3) Open project property window, go to the compile tab and check “Register for COM interop”
 4) All the class must have “Public” and the method which you want to access from VB must have "Runtime.InteropServices.ComVisible(True)"
 Example: VB.NET Code
<Runtime.InteropServices.ComVisible(True)> _
Public Function GetEmployeesRecordSet() As ADODB.Recordset
‘---Implements code goes here
End Function
5) Build complete project, after successfully build, it will create DLL, this dll you have to registered using “regasm”, basically this utility will convert dll into tlb and this tlb file you can add as a reference in the VB project
6) To convert your DLL, open command prompt , go to
C:\SYSROOT\Microsoft.NET\Framework\v2.0.50727> OR
C:\WINDOWS\Microsoft.NET\Framework\v2.0.50727>
7) Type >regasm /tlb:MyDLL.tlb D:\MyDLL.dll
8) Now in the same folder where your project DLL exist MyDLL.tlb file created
9) Open VB project , go to the “Project à Reference”, browse MyDLL.tlb and add the reference
10) Now you can create new instance of MyDLL in VB project and use all the methods here
Example: VB6 code
‘Create the instance of the Dotnet DLL
Dim Customer As New MyDLL.Customer
Dim oRecordSet As ADODB.Recordset
‘Call DOTNET Method in VB6.0 code
Set oRecordSet = Customer.GetEmployeesRecordSet()
Set Me.DataGrid1.DataSource = oRecordSet
Create a COM callable assembly in Visual Basic .NET
You can directly create .tlb file without using “regasm” utility
1. Start Visual Studio .NET or Visual Studio 2005.
2. Add new Class Library project
 3. Name the project MyDLL, and then click OK.
4. By default, Class1 is created.
5. Delete Class1.vb.
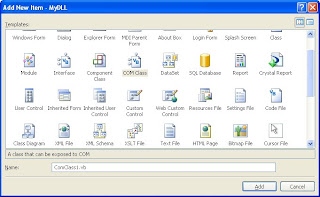
6. Add New Class, Under Templates, click COM Class.  7. Name the class Customer.vb, and then click Open
8. Customer class is created automatic with the following code.
<ComClass(Customer.ClassId, Customer.InterfaceId, Customer.EventsId)> _
Public Class Customer
#Region "COM GUIDs"
' These GUIDs provide the COM identity for this class
' and its COM interfaces. If you change them, existing
' clients will no longer be able to access the class.
Public Const ClassId As String = "febffb43-d30e-4502-88be-5c9a41fda443"
Public Const InterfaceId As String = "c2322774-857f-4596-b6c5-90a5b3bef81e"
Public Const EventsId As String = "1ec82650-4183-4cfe-9a02-284bd3d258ea"
#End Region
' A creatable COM class must have a Public Sub New()
' with no parameters, otherwise, the class will not be
' registered in the COM registry and cannot be created
' via CreateObject.
Public Sub New()
MyBase.New()
End Sub
End Class
8. Add the following function to Customer.
Public Function GetEmployeesRecordSet() As Integer
Return 777
End Function
9. Verify that the Register for COM Interop check box is selected, and then click OK.
10. On the Build menu, click Build Solution to build the project.
11. Start Visual Basic 6.0.
12. On the File menu, click New Project, and then click to select Standard EXE in the New Project dialog box.
By default, a form that is named Form1 is created.
13. On the Project menu, click References.
14. In the Available References list, double-click to select MyDLL, and then click OK.
15. Add a command button to the form.
16. Double-click Command1 to open the Code window.
17. Add the following code to the Command1_Click event.
Dim myObject As New MyDLL.Customer
MsgBox myObject. GetEmployeesRecordSet
18. On the Run menu, click Start.
19. Click the command button.
You should receive a message that displays 777.
Creating COM Components using Visual C#.NET
To create and buid project in same way as above , for C# below bold point needs to be added into the Assembleinfo.cs files.
1.) Create a new Project Class Library (say MyDll), add one class say (Customer)
2.) Create a key pair
3.) A Properties folder with an AssemblyInfo.cs file was created right click on the folder and open properties. The default should be ‘Class Library’
4.) Go to the signing tab and check Sign the assembly, browse and point it to the ‘key.snk’ file.
5.) Open the AssemblyInfo.cs , add [assembly: AssemblyKeyFileAttribute(@”..\..\key.snk”)]
6.) In the AssemblyInfo.cs set [assembly: ComVisible(true)], now copy the assembly GUID that was auto created with the file.
7.) Put [System.Runtime.InteropServices.GuidAttribute(”paste guid here”)] in your main class file in
between the Namespace and Class.
8.) Create public member function
public ADODB.RecordSet GetEmployeesRecordSet()
{
}
9.) Build the solution.
Register the Assembly
10.) C:\WINDOWS\Microsoft.NET\Framework\v2.0.50727>regasm /tlb: MyDll.tlb "MyDll.dll"
11.) Now create one VB project and add reference of “MyDll.tlb” and now you can create instance of MyDll project see below
Example: VB6 code
‘Create the instance of the Dotnet DLL
Dim Customer As New MyDLL.Customer
Dim oRecordSet As ADODB.Recordset
‘Call DOTNET Method in VB6.0 codeSet
oRecordSet = Customer.GetEmployeesRecordSet()
Set Me.DataGrid1.DataSource = oRecordSet
Reference: