Thursday, August 14, 2008

Error: Attempted to read or write protected memory. This is often an indication that other memory is corrupt.

Error: "Attempted to read or write protected memory. This is often an indication that other memory is corrupt."

This error can come because of multiple reasons. I faced this issue while I have Oracle 10g and Oracle Express install.
If you have Oracle 10g and visual studio 2.0 in your machine and you over that you install
Oracle express edition.
Now if you try to connect Oracle 10g or Oracle XE to execute any SQL statement or stored procedure from .NET using "Oracle.DataAccess.dll" then you will get following error:
"Attempted to read or write protected memory. This is often an indication that other memory is corrupt."
Exception Type: AccessViolationException was unhandled

Why:
Actually when you have oracle 10g installed in your machine and then you install Oracle XE, Then Oracle XE adds its path first in the system environment variable.
Basically Oracle XE Bin folder and Oracle 10g Bin folder have same "Oracle.DataAccess.dll" DLL. When you run .NET application which is using this "Oracle.DataAccess.dll" DLL, then will give first preference to Oracle XE DLL and somehow .NET will throw an error. So Problem is in Oracle XE "Oracle.DataAccess.dll" DLL.

Solution -1
The solution is; Change path order in the system environment variable; move Oracle XE path after Oracle 10g Path.
How
Go to 'My computer' --> right click and go to 'Property' --> go to 'Advance Tab' --> Click 'Environment Variable' button --> in the 'System variable' section select 'Path' and --> click 'Edit' button --> now change the variable value
Before: C:\oraclexe\app\oracle\product\10.2.0\server\bin; c:\oracle\10gR2Client\bin;
After: c:\oracle\10gR2Client\bin; C:\oraclexe\app\oracle\product\10.2.0\server\bin;
Maroon: Oracle 10g Path
Blue: Oracle XE path
Click "OK" then again "OK" and restart your system. This error should not be there.
Solution-2
Always install Oracle XE before Oracle 10g other wise Oracle XE will overwrite "Oracle.DataAccess.dll" DLL from Oracle 10 g DLL.

Tuesday, July 15, 2008

How to call VB 2005 or VB.net assembly/DLL from VB 6.0

    How to call VB 2005 or VB.net assembly/DLL from VB 6.0

1) Create any VB.NET class library project (say MyDll), here I am giving example of calling Visual Basic .NET or Visual Basic 2005 assembly from Visual Basic 6.0

2) Add any class (say Customer) and create some method (say GetEmployeeRecordset()) inside it 3) Open project property window, go to the compile tab and check “Register for COM interop”
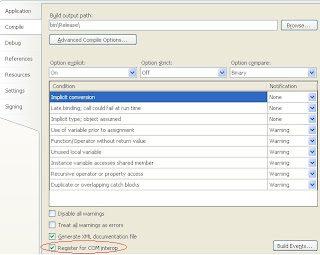
    4) All the class must have “Public” and the method which you want to access from VB must have "Runtime.InteropServices.ComVisible(True)"

    Example: VB.NET Code

    <Runtime.InteropServices.ComVisible(True)> _
    Public Function GetEmployeesRecordSet() As ADODB.Recordset
    ‘---Implements code goes here
    End Function

    5) Build complete project, after successfully build, it will create DLL, this dll you have to registered using “regasm”, basically this utility will convert dll into tlb and this tlb file you can add as a reference in the VB project

    6) To convert your DLL, open command prompt , go to

    C:\SYSROOT\Microsoft.NET\Framework\v2.0.50727> OR
    C:\WINDOWS\Microsoft.NET\Framework\v2.0.50727>

    7) Type >regasm /tlb:MyDLL.tlb D:\MyDLL.dll

    8) Now in the same folder where your project DLL exist MyDLL.tlb file created
    9) Open VB project , go to the “Project à Reference”, browse MyDLL.tlb and add the reference

    10) Now you can create new instance of MyDLL in VB project and use all the methods here

    Example: VB6 code

    ‘Create the instance of the Dotnet DLL
    Dim Customer As New MyDLL.Customer
    Dim oRecordSet As ADODB.Recordset
    ‘Call DOTNET Method in VB6.0 code
    Set oRecordSet = Customer.GetEmployeesRecordSet()
    Set Me.DataGrid1.DataSource = oRecordSet

Create a COM callable assembly in Visual Basic .NET

You can directly create .tlb file without using “regasm” utility

1. Start Visual Studio .NET or Visual Studio 2005.
2. Add new Class Library project

3. Name the project MyDLL, and then click OK.
4. By default, Class1 is created.
5. Delete Class1.vb.
6. Add New Class, Under Templates, click COM Class.
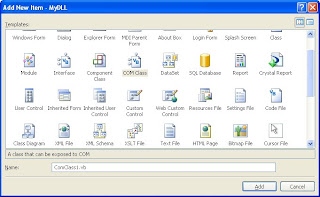
7. Name the class Customer.vb, and then click Open

8. Customer class is created automatic with the following code.

<ComClass(Customer.ClassId, Customer.InterfaceId, Customer.EventsId)> _
Public Class Customer

#Region "COM GUIDs"
' These GUIDs provide the COM identity for this class
' and its COM interfaces. If you change them, existing
' clients will no longer be able to access the class.
Public Const ClassId As String = "febffb43-d30e-4502-88be-5c9a41fda443"
Public Const InterfaceId As String = "c2322774-857f-4596-b6c5-90a5b3bef81e"
Public Const EventsId As String = "1ec82650-4183-4cfe-9a02-284bd3d258ea"
#End Region

' A creatable COM class must have a Public Sub New()
' with no parameters, otherwise, the class will not be
' registered in the COM registry and cannot be created
' via CreateObject.
Public Sub New()
MyBase.New()
End Sub

End Class
8. Add the following function to Customer.

Public Function GetEmployeesRecordSet() As Integer
Return 777
End Function

9. Verify that the Register for COM Interop check box is selected, and then click OK.
10. On the Build menu, click Build Solution to build the project.
11. Start Visual Basic 6.0.
12. On the File menu, click New Project, and then click to select Standard EXE in the New Project dialog box.
By default, a form that is named Form1 is created.
13. On the Project menu, click References.
14. In the Available References list, double-click to select MyDLL, and then click OK.
15. Add a command button to the form.
16. Double-click Command1 to open the Code window.
17. Add the following code to the Command1_Click event.

Dim myObject As New MyDLL.Customer
MsgBox myObject. GetEmployeesRecordSet

18. On the Run menu, click Start.
19. Click the command button.

You should receive a message that displays 777.

Creating COM Components using Visual C#.NET

To create and buid project in same way as above , for C# below bold point needs to be added into the Assembleinfo.cs files.

1.) Create a new Project Class Library (say MyDll), add one class say (Customer)
2.) Create a key pair
3.) A Properties folder with an AssemblyInfo.cs file was created right click on the folder and open properties. The default should be ‘Class Library’
4.) Go to the signing tab and check Sign the assembly, browse and point it to the ‘key.snk’ file.
5.) Open the AssemblyInfo.cs , add [assembly: AssemblyKeyFileAttribute(@”..\..\key.snk”)]
6.) In the AssemblyInfo.cs set [assembly: ComVisible(true)], now copy the assembly GUID that was auto created with the file.
7.) Put [System.Runtime.InteropServices.GuidAttribute(”paste guid here”)] in your main class file in
between the Namespace and Class.
8.) Create public member function
public ADODB.RecordSet GetEmployeesRecordSet()
{
}

9.) Build the solution.
Register the Assembly
10.) C:\WINDOWS\Microsoft.NET\Framework\v2.0.50727>regasm /tlb: MyDll.tlb "MyDll.dll"
11.) Now create one VB project and add reference of “MyDll.tlb” and now you can create instance of MyDll project see below
Example: VB6 code
‘Create the instance of the Dotnet DLL

Dim Customer As New MyDLL.Customer

Dim oRecordSet As ADODB.Recordset

‘Call DOTNET Method in VB6.0 codeSet

oRecordSet = Customer.GetEmployeesRecordSet()

Set Me.DataGrid1.DataSource = oRecordSet

Reference:

http://support.microsoft.com/kb/817248/EN-US/

Wednesday, June 11, 2008

SQL Server 2005 Stored Procedure Coding Guidelines and Best Practices

SQL Server 2005 Stored Procedure Coding Guidelines and Best Practices

Must read before start writing stored procedure in SQL server 2005

Do

  1. Write SET NOCOUNT ON in top of the procedure
  2. Every SELECT statement should return with WITH NOLOCK key word.
  3. Procedure should be rerunnable, Use IF EXISTS statement …
  4. procedure always should have return value or return parameter
  5. Use output parameter wherever necessary
  6. Each code (for loop, If else etc) should be in BEGIN .. END block. For conditional checks( if else), please follow the same.
  7. Use 'Derived tables' wherever possible, as they perform better. Consider the following query to find the second highest salary from the Employees table:

SELECT MIN(Amount) FROM Department WHERE DeptID IN

( SELECT TOP 2 DeptID FROM Department ORDER BY

Amount Desc)

The same query can be re-written using a derived table, as shown

below, and it performs twice as fast as the above query:

SELECT MIN(Amount) FROM

( SELECT TOP 2 Amount FROM Department ORDER BY

Amount DESC) AS D

Don’t

  1. Do not include any business logics in your stored procedures, build a Business Logic Layer for that. Keep to what SQL was made for, inserting, deleting and selecting data.
  2. Do not use reserved words, if you can’t avoid the use square brackets like: [event]
  3. Do not use ‘SP_’ or ‘SYS_’ as a prefix in the stored procedure name.
  4. Do proper Error handling in the procedure : use sp_addmessage to create user defined messages and raiserror for raising and passing the error code and description back to calling application.
  5. Try to avoid wildcard characters at the beginning of a word while searching using the LIKE keyword, as that results in an index scan, which defeats the purpose of an index. The following statement results in an index scan, while the second statement results in an index seek:

SELECT Ename FROM Employee WHERE Ename LIKE '%han'

SELECT Ename FROM Employee WHERE Ename LIKE 'A%n'

Also avoid searching using not equals operators (<> and NOT) as they result in table and index scans.

  1. Avoid the creation of temporary tables while processing data as much as possible, creating a temporary table means more disk I/O. Consider using advanced SQL, views, SQL Server 2000 table variable, or derived tables, instead of temporary tables.

14. Do not use SELECT * in your queries. Always write the required Column names

after the SELECT statement, like:

SELECT CustomerID, CustomerFirstName, City

This technique results in reduced disk I/O and better performance.

  1. Do not wtite insert statement without defining the column name like below

INSERT INTO LMS_ERROR_LOG VALUES

( @pProspectId, @pMethodName, @pErrorMsg,

getdate() )

Always define the column name in the insert statement like below

INSERT INTO LMS_ERROR_LOG

( PROSPECT_ID,METHOD_NAME, EXCEPTION,DATE_TIME ) VALUES

@ProspectId,@pMethodName,@pErrorMsg,getdate() )

  1. Do not write multiple declare statement inside the procedure like

Declare @Fname nvarchar(100)

Declare @Mname nvarchar(100)

Instead of that you can write like below

Declare

@Fname nvarchar(100),

@Mname nvarchar(100)

I normally follow below guidelines too for consitancy

  1. Stored procedure name should be in CAPS latters for consistancy
  2. Do Proper indenting ( 2 tabs for start and same for next levels)
  3. Stored procedure name should follow some standrad to identify as below PROJECT_NAME_<SELECT OR INSERT OR UPDATE OR DELETE>_<OPERATION or TABLE_NAME>
  4. Global parameter start with "p" and local parameter start with "v" . and for OUT parameter name should @pOut<ParameterName>
  5. Created By/Date and purpose must be in the procedure as comment
  6. All key word should be in the CAPITAL latters

Sample Stored Procedure

IF EXISTS (SELECT * FROM dbo.sysobjects

WHERE id = object_id(N'[dbo].[LMS_INSERT_ERROR_LOG]')

And OBJECTPROPERTY(id, N'IsProcedure') = 1)

DROP PROCEDURE [dbo].[LMS_INSERT_ERROR_LOG]

GO

CREATE PROCEDURE SP_LMS_INSERT_ERROR_LOG

@pProspectId INT,

@pMethodName NVARCHAR(100),

@pErrorMsg NVARCHAR(1000)

AS

/**

Created By/Date : Ritesh Kesharwani / 16th Jun 2008

Purpose : Log error into LMS_TRN_ERROR_LOG table

Modified History

Name/Date Purpose

Ritesh/25th July 2008 Added new parameter for business change

**/

SET NOCOUNT ON

DECLARE @vLeadId INT

BEGIN

INSERT INTO LMS_ERROR_LOG

( PROSPECT_ID,METHOD_NAME,EXCEPTION,DATE_TIME )

VALUES

( @pProspectId,@pMethodName,@pErrorMsg,getdate() )

RETURN 0

IF (@@ERROR>0)

GOTO errHandler

errHandler:

RETURN -1

END

GO

Wednesday, May 28, 2008

How to create DLL for .NET 2.0 Web Application

How to create DLL for .NET 2.0 Web Application

If you have layers structure in .NET solution and when you build the solution, visual studio creates DLLs for business layer and data access layer, but visual studio not creates DLL for presentation or UI layer.

You will face issue to run Microsoft FxCop tool for Presentation layer. To run FxCop tool you needs dll or exe. You can create dll for presentation layer using VS 2005, follow the steps below

1) Create a new folder on C drive, like: C:\Temp\ProjectDeploy

2) Open the project in the Visual studion 2005

3) Go to the project right click and choose “Publish Web site” option

4) Give “C:\Temp\ProjectDeploy” in the Target Location and click “OK”

5) You will see your presentation layer dlls inside the ProjectDeploy\bin folder

Note: Fxcop Tool can be integrate with visual studio 2005 see more details here

Tuesday, May 13, 2008

PROGRAMATICALLY CONFIGURATION FILES ENCRYPTION AND DECRYPTION USING C#.NET

PROGRAMATICALLY CONFIGURATION FILES ENCRYPTION AND DECRYPTION USING C#.NET

In .Net application (web/window) configuration file we used to make application setting as configurable. Each and every time you need not to compile your project for any setting changes in the configuration file. This configuration file present in virtual directory of the application. When you deploy the application, it can be editable by the users who have all permission for that deployment server and one server can have several applications, this time it is necessary to keep your application configuration file secure or use encrypted configuration file to secure your application setting data.

Previously we used to write encryption decryption function using different .Net notation (like: SHA, MD5 etc) and manually updating configuration file. Here I am giving new way to do same task programmatically, you can do encrypt or decrypt any project configuration file appSettings or connectionStrings sections programmatically

ASP.NET 2.0 and above makes it extremely easy to encrypt connection strings, encrypt application settings, and encrypt config sections in Web.config either via the command prompt with aspnet_regiis or programmatically in your web applications.

Source Code:

Create application to encrypt or decrypt configuration file using C#/VB.Net windows or web application.

Here I am creating window application using C#.net, Follow the simple four steps to create application.

1) app.config file sections Before Encryption

For example:

<appSettings>

<add key="ServerName" value="Your Machine Name" />

<add key="Password" value="123.456.78" />

</appSettings>

2) app.config file sections After Encryption

For example:

<appSettings configProtectionProvider="DataProtectionConfigurationProvider">

<EncryptedData>

<CipherData>

<CipherValue>MSDFSDFGSSD$SFSD%VAAAAAAGDFGDFGGGGGGGVBCXBVBVCBBVCVBVCBBBTYRTYRTY%UUUUUUUU</CipherValue>

</CipherData>

</EncryptedData>

</appSettings>

2) You can design your window form something like below

3) Code for Encrypt and Decrypt button

NameSpace

using System.Web.Configuration;

Call following function from Encrypt button code behind

Function for Encryption

private int EncryptConfigurationSection(string fileName, string sectionName, string provider)

{

//Creates a FileMap Object to store the File Name of Configuration File

ExeConfigurationFileMap FileMap = new ExeConfigurationFileMap();

//Assigning the File Name to the File Map

FileMap.ExeConfigFilename = fileName;

//Retrieving the Configuration from the File Provided

Configuration config =

ConfigurationManager.OpenMappedExeConfiguration(FileMap, ConfigurationUserLevel.None);

//Checking if the File Provided is a Configuration File Or Not

if (config.HasFile) {

//Retrieve the Section from the Configuration Object

ConfigurationSection section = config.GetSection(sectionName);

//Check if the Section is not null or is not Previously Protected

if (section != null && !section.SectionInformation.IsProtected) {

//Provide Protection to the Section as per the provider

section.SectionInformation.ProtectSection(provider);

//Save the Configuration object and the File

config.Save();

return 1;

}

else{

if (section != null) {return 3;}

else {return 0;}

}

}

else {return 2;}

}

Function for De-Encryption

Call following function from Dncrypt button code behind

private int DncryptConfigurationSection(string fileName, string sectionName)

{

//Creates a FileMap Object to store the File Name of Configuration File

ExeConfigurationFileMap FileMap = new ExeConfigurationFileMap();

//Assigning the File Name to the File Map

FileMap.ExeConfigFilename = fileName;

//Retrieving the Configuration from the File Provided

Configuration config =

ConfigurationManager.OpenMappedExeConfiguration(FileMap, ConfigurationUserLevel.None);

//Checking if the File Provided is a Configuration File Or Not

if (config.HasFile) {

//Retrieve the Section from the Configuration Object

ConfigurationSection section = config.GetSection(sectionName);

//Check if the Section is not null or is not Previously Protected

if (section != null && section.SectionInformation.IsProtected) {

//Remove the Protection from the Section

section.SectionInformation.UnprotectSection();

//Save the Configuration Object and the File

config.Save();

return 1;

}

else {

if (section != null) {return 3;}

else {return 0;}

}

} else {return 2;}

}

Note:

In the above functions 0 to 3 used for

0 --> Wrong Section as per Configuration file

1 --> Successful Encyprtion/Decryption Information

2 --> Wrong Configuration File name

3 --> Configuration section in file is not encrypted

H/W Platform: Dual Processor with 1 GB RAM

S/W Environment: ASP.NET, VB.NET and C#.NET